Manor Green … and a Little Cappuccinno
A GORGEOUS GREEN
Oh, how I love a vintage piece of furniture AND a gorgeous colour of Fusion Mineral Paint … these two are a match made in heaven !!
The trek to pick up this beauty was an interesting one, and I am so happy that Scott and I went to find her ! She was left outside for us at the end of a VERY long and windy rural road … she was definitely waiting for me to come get her and offer her a new life !!
First she needed a good cleaning …. TSP Alternative is my number one step to making sure all the dirt, grease and grime is gone so she can accept her new color !

PRIMER
She was a gorgeous shade of redwood … and was for sure going to belled right through any paint i put on her … even though I was using a darker shade of green, I decided to put a coat of PRIMER on her first. This is a fantastic primer sealer stain killer to seal in the bleeding of tannins from certain types of wood, or knots from pine for example …. one coat is often good, but 2 won’t hurt either !

Once the primer has dried (i leave mine for at least 24 hours just so i am sure it’s good and dry) … then I can start to apply my first coat of paint !
I have a routine and i rarely stray from it … I start with a brush (this one below is one of my faves) and paint on my first coat !
A light sand with a high grit sandpaper is step 2 …. then i paint on a 2nd coat !

Your first coat never looks good and shouldn’t have enough paint to cover the piece solid. That is what your 2nd coat is for, full coverage.
Once I’ve waited a minimum of 2 hours (preferably 4) i will do another light sand. This takes off any little stippling or grit etc … then paint on my 2nd coat !!


LAST STEP
My last step, before a wet sand if I am doing one, is a roller on the flat surfaces of my piece ! I roll my Staalmeester Roller into my paint color and roll almost all of it off. As I am not using this as a 3rd coat, but more of a softening of the 2nd coat. I don’t transfer a ton of paint but give a beautiful light finish without any brush or roller strokes … it is my fave way to end the paint portion of a piece !


FINISHING OIL
Even though I sanded the top of this piece, it still was showing quite red and so using a natural stain wasn’t going to give me the look that I wanted to compliment the rich Manor Green … I painted on a generous coat of Cappuccino Stain & Finishing Oil (SFO), let it absorb into the wood for approximately 15 minutes, then wiped it back using a lint free sponge !!
While one coat gave me the color and look that I was hoping for, you can absolutely layer SFO until you get the depth of color that you want for your project ! AND, it gives more of a sheen … as well as more durability the more layers you add … It really is a perfect finish !!

DRAWERS
Lining the drawers of a dresser, buffet or hutch is always a beautiful touch and one that I love adding to my pieces. For this one, I used a pretty gold pattern in the top 3 sectioned drawer and the larger square door, while I left the others original wood and conditioned them with our Beeswax Finish (see below)

HARDWARE
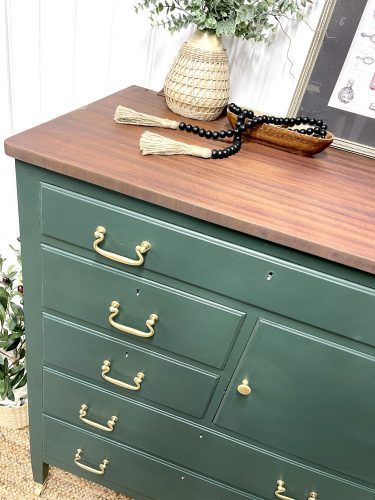
The hardware on a vintage piece is such a special part of the overall look and feel. And when it is original AND in great condition, you have so many options !
For this project I LOVED the handles and cleaned them well before adding a fresh coat of gold paint to them …

FINAL TOUCHES
The wheels are super old and also original, so a good clean and a matching spray of gold paint was the best choice for them as well !
One of my fave techniques at the end of my project is to do a little wet sanding. This is a great way to smooth out any little stippling that may have occurred when you’ve put on your final coat or roll of paint and will leave you with a soft as a baby’s bottom feel !!

Using our Continuous Mister and Sanding Sponge/Pad is THE best way to achieve this …

It takes a little practice, but once you get the hang of it, you’ll be in love !

Did you know that you can use our Beeswax Finish to condition wood ?! It is a fabulous way to bring renewed life to the inside of drawers too. I used it inside all the drawers that I didn’t line on this piece and they look FABULOUS !!

On a piece of furniture that is as old as this one is (roughly 100 yrs), there are bound to be imperfections. You’ll find a few little nicks and dents here and there, and a few spots of thin veneer, but it all adds to the character this timeless project !

As much as I fell in love with her, she is ready for her new home now. You can check out her dimensions, pricing and pick up information HERE !

Standing back and seeing her in all her beauty is SUCH a fabulous part of the journey and it is so rewarding !!
SO many hours of planning and prep and paint and finishing and now she is ready for her new forever home. You can purchase her HERE!

YOU CAN DO THIS TOO !!
I offer WORKSHOPS in my space to teach you all you need to know about how to create pieces like this for your own home! And I sell ALLLL the things in our shop …. both ONLINE and IN -PERSON shopping options are available !!
If you think this stunner is perfect for your home, don’t wait, purchase and pick her up just in time for the holiday season !!
Until Next Time … j. XOX


