Console Table Transformation
When I got the call from the owner of this gorgeous table, asking me to re-imagine her, i was thrilled !
This was such a pretty piece of furniture to begin with, but the color had worn out it’s welcome in their home and they wanted a change.
CHANGE NEEDED

The first photo is in their home and you can really see the orange tone of the wood, but the shape and style of the piece is beautiful and so classy !
When I got in into my workshop I put it against my photography wall to see how it looked in my light and then we made some decisions !
Originally, the talk was to have me sand the entire piece down to raw wood and re-stain using Fusion Cappuccino SFO. While that would have been beautiful, I offered a few alternatives.
When you book a custom project with me, there are many questions asked before we start so that I can make sure you end up with exactly what you’d hoped for, even if it may not be what you originally thought you wanted !

PREPPING FOR STAIN
My job is not only to execute the re-imagining process, but also to give you options that you maybe hadn’t thought of …
The final choice was to paint the bottom and drawers, while sanding the top and edges to raw wood and re-stain … and I was really excited about getting started !!
First step is ALWAYS to clean clean clean … it doesn’t matter if the piece looks clean, clean it again using my favorite TSP Alternative ! This is so easy and safe to use, lasts a long time AND can be used on high traffic areas in your household such as door handles and touch spots on walls etc … Also, unlike original TSP, which is full of chemicals and needs to be rinsed off, TSP Alternative is sprayed on, wiped off and left to dry … no odor or further rinsing required !

Once I had any fingerprints, oil and dirt removed, it was time to tackle the top. I started by using my FAVE Carbide Scraper. This tool lives in the top of my tool bag where I can grab it easily as i use it darn near daily for one project or another. If you are considering refinishing furniture for business or pleasure, this is an inexpensive add to your tool kit and one that you will love – promise !


SAND AND STAIN
Post scraping came sanding. I used my Surfprep 3 x 4″ Sander using Medium+ grit pads (comparable to 150 – 180 grit) to prepare the surface for stain. Once I used the Medium pads, I made it buttery soft using a Very Fine pad (comparable to 280 – 380 grit) for finishing !

Prepping the surface well makes for a much more enjoyable stain experience !
Fusion Stain and Finishing Oil in Cappuccino is such rich color and I applied it using an inexpensive foam brush, let sit for 15 minutes and then wiped it off using a lint free cloth. You need to wait a minimum of 9 hours before re-coat, but I usually like to leave it overnight and go back the next day to decide if another layer is needed ! For this piece, 2 coats were used … REMEMBER: the more coats, the deeper the color and higher the sheen !
READY FOR PAINT

Cashmere by Fusion Mineral Paint was the color choice. This is a warm and luxurious neutral that has a slight cream undertone. It is gorgeous and is a perfect compliment to the stained top ! I started with a pint of paint and after (3) coats, I had roughly 1/3 of the pint remaining ! Fusion goes a long way when applied correctly ! I always like to remember that less is more … you can always add another layer, but it is much more labour intensive to take it away !

BRUSHES AND ROLLERS
OK … you’ve picked your paint color, now what ?! This is a very common question … where to start ?!
I always remind new DIY’rs that using the right tools makes ALL the difference in the outcome of your project …
Brushes are an investment and need to be thought of as such, rather than a one time use and toss … and as long as you care for them properly and use Brush Cleaner on them to clean, you’ll have them forever !

If you make the commitment to use a high quality paint such as Fusion, you need to make an equal commitment to the type of brush you use to apply.
Staalmeester brushes are my favorites … there are a wide range of styles to choose from and truly are brushes for every type, style and stage of your project.
For this piece i used my all time fave small Decorative Spalter. The bristles are THE softest every and the way it fits in my hands gives me so much control.

This Pointed Sash is another one of my go to brushes at some point in the process for most of my projects. The multi length bristles are a combination of natural and synthetic and the shape provides a really great way to get into corners like the ones that were on the underneath of this table top !

The last brush that I used on this piece is this Artist Brush. The short flat lay of the bristles is perfect for straight edges and detail work. I used it on the underside to create clean and straight lines at the edge where the base of the table meets the top of the table. It is also really great to use on the edges of drawers, as shown below.You need a steady hand, but the results are exceptional !

Because this project was changing in color from dark to light and didn’t require a primer, so I did add a third coat to get the desired coverage.
My final paint coat on flat surfaces is always applied using my fave yellow roller arm (yes, it helps that yellow is my fave color) and these Staalmeester Microfibre Roller Refills. They give the smoothest finish and are a fabulous final step … final that is if you’re not doing a Wet Sand !


WET SANDING
What is Wet Sanding you may be wondering ?! It is the best way to get that soft as a baby’s bottom feel to your painted furniture … and it is definitely a learned skill ! DO NOT be upset if you don’t get the hang of it first try … it takes some practice to get the right feel and pressure, but once you get it, you’ll be addicted !!


These are the products you need to accomplish this fabulous technique. A fine mister for your water as you don’t want to have too much, or big droplets of water on your piece, as well as a wet sanding pad !
Check out THIS VIDEO to see Founder of Fusion Mineral Paint, Jennylyn, demonstrate how to do it !!

THE DETAILS
When re-imagining a piece of furniture, i spend time thinking of the details. Things like lining the drawers with beautiful patterns, potentially adding detailing to the outer edges of the drawers, new felt pads on the feet of each piece and/or drawer stoppers on the inside to avoid chips or sticking. These seemingly small details make a huge difference in the overall finish of a piece and are so important to me and my clients.
This particular Peel n Stick Wallpaper is one of my fave designs and looked incredible with the color choice on this piece ! You can find it HERE !!

MY FAVE WAX
While Fusion Mineral Paint has a built in topcoat and doesn’t require any additional protection, I make the decision to add a finishing product based on where and how the piece is being used.
In this case, it is going into a vacation home with animals and I wanted to give it just a little extra support as well as that super soft feel !
We offer (10) different choices for Furniture Wax in our Online Shop. Clear Furniture Wax is usually my go to, but the scent of this Fields Of Lavender Wax is SO good, so this was the winner !
It is super easy to apply with a sponge or a cotton sock on your hand … OR you can paint on using a brush that you ONLY use for wax, then buff off with a lint free cloth or cotton sock after !!
REMEMBER though, that if you apply wax and then need to make any touch ups to the paint, you will have to remove the wax using Odourless Solvent before re-applying the paint.

THE BEST COMPLIMENT
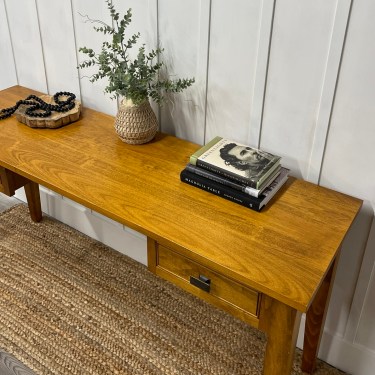
This is how i had this girl staged when her owners came to pick her up … their reaction was AMAZING and every furniture artists dream. A gasp, hands up to face and tears in eyes … truly, THE best compliment i could ever receive.
When I am given the opportunity to work with you on something from your home, I take it so seriously and treat it as if it going into my own home.
Every step is thoughtfully completed with you in mind. I want you to love it … and I want you to love it enough to tell your friends … and if you want to change it again down the road, I hope you’ll come back to me !!
HUGE love and thanks to this girls family … i really loved creating her with you !
Until Next Time … j. XOX


