Coffee Table Transformation
Back in the summer of 2022 i received a phone call from Habitat For Humanity Re-Store in Nanaimo, BC asking me if I would consider coming and teaching paint workshops once a month using Fusion Mineral Paint !
They are Fusion Stockists as well, and I love to paint, so of course I said YES !! I always enjoy every opportunity to paint and share my knowledge with others … AND this also meant that i would get to spend time in the Re-Store with all the gorgeous pieces of furniture just waiting to be re-imagined !
This is how i came to own this stunner of a coffee table … ok, she wasn’t quite a stunner when i took her home, but her shape seduced me as soon as i saw her and i knew she needed some love !

First things first … CLEANING !! Do not ever skip this step .. you have no idea where your piece has been … and even if you do, there will still be dirt build up, oils from fingers and even residue from cleaning supplies. 2 capfuls of TSP Alternative in a litre of water and you’ll be good to go …


… THIS is the kind of dirt and grime that you need to be sure you remove before you paint. Even if you can’t see it, you STILL need to clean it !
Oftentimes people will grow tired of the look of a piece of furniture and want a quick change, so they choose a paint color they like, but not necessarily the correct TYPE of paint. This was the case with this table …

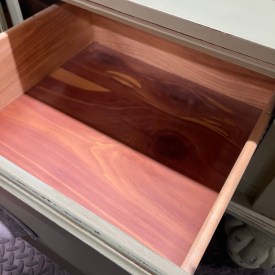
BUT … take a look at the inside of the drawers !!

That wood is STUNNING and didn’t require anything but some conditioning !! Thank goodness this was the easy part … I could tell that the base had green paint over top of black paint, so I decided to strip it first before sanding.


This saves time and sanding supplies, and would give me a more clear picture of the wood underneath. QCS Vintage Furniture Stripper by Stripwell is my fave. It’s non-hazardous and eco-friendly, making it much less toxic than most others, and it works really well in a fairly short amount of time.

This old girl was REALLY covered in paint and needed (2) thick coats of stripper and a whole lotta elbow grease. The trick to stripper is leaving it on just long enough without letting it dry (or it will start to get gummy), combined with a really great scraping tool.

My go to is a Carbide Scraper. This one is great as it can be taken apart completely for cleaning !
Once I scraped all the stripper and paint off (this took quite some time as there were several layers), it was time to really let the wood dry. I left it overnight (approx. 12 hours) and then went back for sanding !

I purchased my Surfprep Sanding System last Summer 2022 and it has been one of the best investments in my shop to date. The sanding pads are an absolute lifesaver and if you are into re-imagining furniture, it will quickly become your best friend ! The way it moves around shaped edges and intricate details in the wood is impressive and will take hours off of your sanding time, AND save your hands in the process !
I sanded this top with 120, 180, 220 and 300 grit sanding papers / pads and the feel is literally like butter !

NOW … let’s talk about that groove that is roughly 1/8″ deep and runs around the table 6″ in from the edge. That required SO. MUCH. PATIENCE. and time !! I had to get into them using this little hand sander and then using my dremel … you can find the one i have HERE …


There was SO much paint stuck and layered into it, and I refused to leave it as it would’ve ruined the look of the table and the stain would have just sat on top of it … it was SO worth the trouble to remove it !
Once I had the finish on top the way I wanted, I gave it another wipe down using my TSP Alternative to be sure that I had all the dust particles removed, and then it was ready for stain !!
I chose Driftwood by Fusion for the top as I knew I wanted a softer color to really offset the Coal Black base. It was PERFECT ! The more coats of SFO (Stain and Finishing Oil) that you add, the higher the sheen. Two layers gave me the exact finish i was looking for !!
I always add the SFO into my projects using a wide foam brush, let it sit for 15-ish minutes and then wipe back using cut up old sheets or shop towels !


There were several spots on the base of this table that had clumps of paint that needed to be sanded down before I added more paint on top. Because this already had paint on it, i technically could have painted over it all again, the Fusion paint would have adhered … BUT the quality was so poor that I wanted to be sure that i got all the lumps and bumps off first, otherwise they would have be amplified when i added a top quality furniture paint on top and i didn’t want that.
Using my Surfprep and a fine grit pad, i went over the entire base a couple of times and reduced the high spots and really cleaned up all the nooks and crannies before i added my paint. Always, be sure to give a good wipe after every sanding moment as you don’t want to leave any dust behind to muck up your new paint !

I use different paint tools for different projects, BUT you can be sure that 1. they are always Staalmeester brushes and 2. always a mix of brush a roller … the VERY odd time i will use my sprayer for bits (more on that another time), but overall i ALWAYS paint my first coat with a brush, a mix of brush and roll second coat and then a super duper light roll to smooth out any imperfections !!
For this table I used this Pointed Sash Staalmeester brush, a roller arm and roller … AND …


… this is my all time, most very fave brush … the Staalmeester ONE Series Decorative Spalter ! There is nothing like the feel of these ultra-fine synthetic bristles and is literally the softest feel ever …
Staalmeester brushes are the Rolls Royce of brushes and the ONE Series is extra special. They are more of an investment than other brushes, but are completely worth every penny …. as long as you take care of them, you’ll have them in your supplies forever … and you will for sure want to add to your collection, they’re that good !!

While quality brushes are an investment, there are some fabulous ways to save, while still building your tool box !! This Staalmeester Brush Set is a fabulous mix of some of our most popular brushes and the pricing is like getting one for free !

Sometimes i have an immediate vision for a piece as soon as i see it, and other times i need to work on it for a while before I decide on a color … and then the odd time i ask for your help and i LOVE this because it is so fun to see what you all see for a project !!
As soon as I saw this table i knew that i wanted it to be Coal Black on the bottom and SFO on top … i still did a poll on Instagram as i wanted to really be sure … and the good news is that the majority of you picked Coal Black too !!

There is often a misconception that you need full coverage right away as soon as you start to add paint to your piece, that is not the case. I always like to say that your first coat shouldn’t look good and you should still see what is beneath it, lightly … like this !


Your second (and any subsequent coats) are where you get the full coverage ! Fusion Mineral Paint is a top quality paint and it is perfect for furniture …

Fusion Mineral Paint has a base coat and top coat built in, cures in 21 days and does not require any finishing products, you can add something if you want !
My go to is Fusion Clear Furniture Wax. It is buttery smooth and goes on like a dream. While you can gently use your piece after a day, the cure time is 30 days … and then it provides the most fabulous extra layer of protection !

The final touch for this gorgeous table, was the hardware. I actually kept the drawer pulls that it came with and added some new paint after a really good clean !
I boiled them in water and baking soda first, then gave them another clean with TSP Alternative before a little scuff sand pre-paint !
I hand painted on Bronze Metallic using a Staalmeester Fitch Angled #18 ONE Series artists brush and it was perfect !


AND … even though there was A LOT of interest in this statement piece, i knew that i couldn’t let her go. She had me at hello and now makes me smile every single time i walk through this space in our house !!
The good news is … even though this girl is off the market, i can help you re-imagine your own table … or do it for you !
If you have a piece of furniture you’d like me to recreate for you, just fill out our Customer Furniture Request Form and we can make a plan !
Thanks for following along …
Until Next Time … j. XOX


