Studio Reveal Part 2 – The Floor
… there was a lot of work to be done before we could start the floor … move out day was a big job as i had managed to ‘store’ A LOT of awesome into this space and now it was going to live in the garage, shop and basement for who knew how long … but it had to be done … i will say that i was starting to have small (and sometimes not so small) regrets about choosing to take this on BEFORE Christmas … i mean, all i could think about was where exactly was i going to create all my holiday magic ?!
Even though i was feeling extreme amounts of stress surrounding this project, i knew we had to keep moving forward … so we got the room emptied and started to asses what exactly we were working with … we quickly realized there was going to be so much more to this than originally expected …
… because it had been a carport prior to being closed in, we were dealing with uneven cement, old electrical and absolutely NOTHING was straight or level – i literally mean NOTHING


We disconnected and removed the old baseboard heaters and tore out all the wood along the base of each wall … this meant i was going to gain a little more width to the room which made me happy !!
Once we had the carpet up – it had been glued to partical board and then nailed to the floor framing below using 3″ nails almost every 4-6″ throughout the entire space … it was AWFUL to remove … this took so much more time than we had anticipated and were all pretty happy once it was up and outside !!


Surprisingly, there was quite a bit of insulation that was still in good condition so we spread it back around the concrete base and added more new thick (and higher rating) insulation on top as we were closing the floor in … the heating in this space was a HUGE concern as it had never been tied into the main heat system in the rest of the house.
We had a heating contractor come in to help us figure out the best solution to both heat and cool this space … with the old baseboard heaters it was still freezing in the winter and sweltering in the summer … unfortunately, we would need to go back to (new) baseboard heaters in my studio until we develop the basement (on the schedule for next year) as the current set up wasn’t up to date enough to be able to add another room to it … we knew we were going to have to completely overhaul this system with the basement development, so we were super happy to now have a plan on how to tie this room into the rest of the house … also, because with the new system we will have CENTRAL AIR – WHOOP WHOOP !!!


We have a wonderful electrician that we found through Construction Craig … and even though he looks at me like i have 3 heads most of the time, we work super well together and he got to know the Type A part of my personality quickly … AND was ok with it (insert happy dance here) … Kevin came in at this point and got the wiring in place for my floor outlets (SO excited about these) so that we could continue to raise the floor … yep – we had to raise the floor !!
OMG – what an ENORMOUS undertaking this was … again, remember NOTHING was level … we were inserting wood at 9″ and 9″3/4″ and 10″ and 11″ for the entire length of this space … i’m not gonna lie, there were a few swear words muttered (or yelled) at this particular section of the build !!
Nonetheless, we made it through, no one got hurt and we are still friends 😉


A few ‘fancy’ cuts to the 4 x 8″ sheets of plywood so that they were as square as we could possibly get them within the walls that were already built, a lot of nails and screws and some excellent supervising by Marshall and we were just about ready to hang the drywall and paint …
INSERT DRYWALL INSTALLATION AT THIS POINT (this is detailed in Part 3)


I had been trying to decide on a flooring material for MONTHS and while i knew the color i wanted – i could NOT decide on the actual material … the reality was that i needed something durable and good for the dogs and me dropping craft supplies etc … but also something that i loved … NONE of what i was finding in the floor shops were working for me … they all felt like plastic and i wanted wood … but hardwood was going to be too soft and not practical for this space at all …
i finally went into our local Windsor Plywood and told them what i wanted – real wood cut to 2 1/4″ width to match the original oak floors throughout the rest of the main level of the house that i could stain grey … once they got over the initial shock of what i was asking for they started to talk types of wood … we ended up deciding on birch plywood as it takes stain well and still shows the grain but would be durable enough for the type of traffic that this studio would see on a daily basis … we then figured out how many sheets i would need and got it ordered … then we took a break, as Christmas was literally around the corner and i wanted to try and salvage any crafty/baking time i could before Scott and Emma came home to Alex and I for the holidays …


Jump ahead to January and the wood was in and cut and ready to start installing … this was the part that was stressful for the crew at Windsor … how exactly was i going to get this flooring laid AND stay down … BONA R851 became my new best (and worst) friend … to tell you that this was easy and seamless would be a complete lie … i had NEVER laid floor before but i had read a lot and asked a ton of questions … and i really wanted to do this … i knew that there would be mistakes (and there were) but i wanted to try it and worst case scenario, i had a beautifully built subfloor to lay NEW flooring on top of …
… we ended up doing it in (3) stages on (3) separate days and it should have actually been done all at the same time in ONE day … there are several spots in one area of the floor that is now covered by my gorgeous rug (SO thankful for this rug – i had actually purchased it long before the floor started to be installed and it ended up being a life saver for this space aesthetically)
… i would FOR SURE do this again but i would only do it in one day and it needed more than (1) or (2) people working on it … the glue starts to take hold MUCH quicker than originally expected and there is absolutely NO moving a piece of wood once it starts to adhere … having said that, we also needed a lot of weight on top to be sure that all sections of the wood WAS adhering and that there weren’t pockets of floor that was lifting, as there was no way we would be able to get glue back in underneath any sections once we moved on …


… FINALLY it was ready to be sanded … and i got to throw my gluey gloves away, but not before i took a pic for posterity … i rented a commercial walk behind sander to try and get all the excess glue etc … off the top and what an awesome tool it was – LOVED this part … the instant gratification part of me was super satisfied watching all the ugly spots disappear !
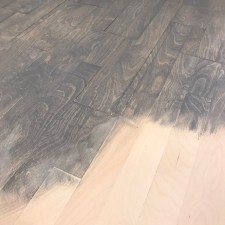
I found the perfect color of grey stain and got to work … this was just pure elbow grease … i was on my hands and knees with gloves on and cloths to apply and rub off the stain … fairly certain i was a little light headed at the end of it all !!
… it was the first LARGE stain project i had ever done and again, despite reading ‘how to’s’ … i still learned a lot and would make adjustments next time … nothing major, but there were inconsistencies in the stain application that i know i could fix next time around … i also knew that the sealer i was applying would take care of a lot of that anyway !!


I used a thick and fluffy paint roller on a long handle so i could stand up and apply the sealer as i backed myself out of the room … i found this part of the process SUPER easy – thank goodness as the rest had felt a bit like i had fought a war with the floor !!
It took a couple of days to completely dry and was VERY smelly … but i LOVE the finish … mostly matte but a little bit of shine when the light hits it … and it feels great whether you’re wearing socks or bare-feet AND easy to wipe clean for dog feet or if you’re wearing shoes in the studio – these were all very important to me 🙂

(the floor is not this dark as you will see in other pics – we hadn’t turned the electrical back on when this pic was taken)
… there were MANY moments during this process that i seriously questioned my sanity and the decision to actually CREATE this floor from scratch essentially … BUT in the end it was the exact look (minus a few hiccups that i’ve creatively hidden) that i was going for … and i knew it was going to look incredible with the furniture pieces and decor that i had already purchased for the space …
… i was SUPER eager to start moving furniture in since it was now over 4 months since we started – ugggggggghhhh
Next up … lighting, drywall and paint oh my …
j. XO


