Summer Bug Catching Layout
by Andie Green
Hello crafty people! Andie on the blog today sharing another layout using the Summer Title Cut File. I hope this finds you all well and inspires you to craft!

My son is such a creature kid – mammals, reptiles, insects, it doesn’t matter he loves them all – and they appear to love him back, lol!

Thankfully this bug is mostly cute and makes for a great scrapbook page for his album. On this day, walking home from school, he carried a grasshopper the whole way home before letting it loose in the yard.
What is your process for creating a layout? Do you start with your photo(s) first? Or your paper? Or, if you’re like me, is it a little bit of everything?

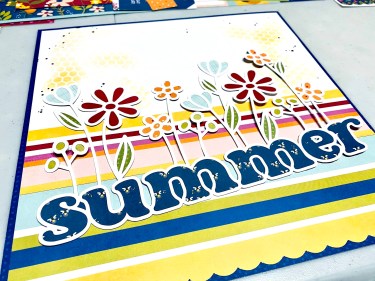
In this case I began with the cut file. I just loved this floral Summer title cut file from the June release and wanted it to be a bold focal point on my layout.

Choosing my paper was easy, as I mentioned I wanted big and bold – and the Summer Lovin’ creative kit is full of bold colours and patterns and cute little bugs!
Next, I chose my base cardstock, a patterned paper, and then sorted through the embellishments for the ones I’d be most likely to use.
I trimmed my pattern paper to 11″ x 11″ and border punched the bottom portion before adhering it to the cardstock base. Anyone else get their new found appreciation for border punches after taking Jennifer’s sketch and UYOP classes?!

Next I did some light inking over a chicken wire stencil. Washi tape is a great tool to help keep your stencils in place!

I then added a few black ink splatters over the stenciling. If you’re like me and struggle with white space on your layouts, these inking techniques are excellent ways to fill in without overburdening your layouts.
Don’t forget a good adhesive! The most important part of building your paper projects, right?! I’ve lost count of how many layouts I’ve had to re-do because the adhesive gave out after a few years. The one that never lets me down is Sookwang double sided tape. Jennifer carries it HERE in many different sizes to use from projects big and smal!

Now that I my base was complete, I was ready to pick patterns to back the cut file with. Those little fireflies peeking through the “summer”, AH! Love it! I wanted this part to stand out more than the flowers.

Finally, piecing it all together and adding in the finishing touches. I brought in pieces from other creative kits also, like the little lady bug foam stickers from the Full Bloom creative kit and the black grid washi tape from The Good Stuff creative kit.

At first, I had the lady bug stickers just tucked beside the letters on their own, but it felt too plain. So, I grabbed some green cardstock and hand cut some grass, put some stitch holes along the bottom of the grass and nestled the lady bugs in.
Using 3D foam adhesive for the cut file and letters gave nice depth and dimension to the layout.

And there you have it! Another buggy layout for my son’s album! Thank you for stopping by to read through my layout creating process.
Happy Scrappin’!
Andie ?


